
Useful Office Tip: Perform Printer Maintenance On The..
Posted by MacroEnter on 16th Dec 2015
Owning a printer requires some hands on maintenance work to ensure that the printer works and continues to work properly as well as have a long lifespan of use. One such aspect of printer maintenance that is often overlooked is checking, cleaning and replacing the dampers in the printer. Dampers are used both in water and solvent-based printers and are considered, by the printing industry, to be consumables much like ink. Dampers, depending upon the frequency of use, should be replaced about every year. This article will look what exactly dampers are, how to inspect them, and how to replace them.
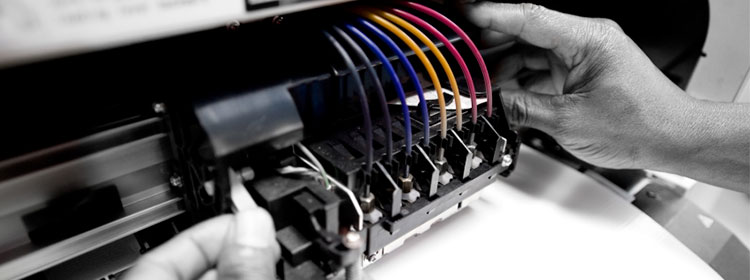
Dampers are small reservoirs that are connected between the ink lines and the print heads. The dampers contain a small filter to help screen contaminants or particles that may come from the ink before reaching the print heads. One important feature of dampers is that the valve from the ink lines is only a one-way, which only allows ink to flow in and to the print heads, not the other way. Also, the small reservoir creates a vacuum effect, once activated by the pump, to maintain a constant flow of ink to the print heads. By creating a constant flow, this allows the print head to refill with ink fewer times during the duration of the printing.
Dampers, like all components, are crucial to a properly working printer, however many overlook or do not even know about them, let alone when to know when to replace them. In order to inspect the dampers of the printer, the carriage that holds the print heads will need to be removed seeing as the dampers are placed just above the print heads on the ink lines. Remove the damper plate that holds the dampers in place to make inspecting easier. The main thing one should be looking for is if the damper reservoir is filled full of ink, which would indicate a clogged filter and in need of replacing. A clogged filter would result in ink dropping in and out during a printing job or excessive cleaning to get “good” test patterns. Dampers need a small amount of space to allow the vacuum effect to maintain good flow of ink. Filters clog over time and tend to happen faster if using bulk ink from third-party vendors due to inconsistent quality and purity of ink.
When it has been determined that the damper needs to be replaced, many resort to a service call, however many manufacturers deem damper replacing a part that users can replace themselves. Once the dampers are exposed, it is sometimes helpful to use pliers to get a better hold and lift the damper up. It is especially important to remove the damper straight off as to not damage the printer head. Next step is to remove the damper from the ink line by unscrewing the nut, be aware that ink may leak from the line. With the old damper removed, insert the new damper into the nut, making sure the o-ring is still present to create a tight seal. Then install the damper back into the printer head making sure that if multiple dampers are replaced that the ink lines match up with the correct printer heads. Simple as that and with some basic but necessary maintenance and inspection, owners can greatly improve the functioning and lengthen the lifespan of their printer.